I have been working as a full-time photographer for years, and have used different combinations of one/two cameras + prime/zoom lenses. Good quality lenses are getting cheaper, lighter, and more compact, and it is more flexible and accessible to try out those “pro spec” without costing you a leg or an arm. If you’re just started your photography journey, what you should understand about a lens? In this post, I will help you to understand the lens basics, the technical aspects of a lens performance, and clear some myths for you!
1. Let’s Understand The Lens Basics
In simple, a lens control the aperture, focal length, and focusing. Understand the lens basics will help you to capture better photos!
Aperture
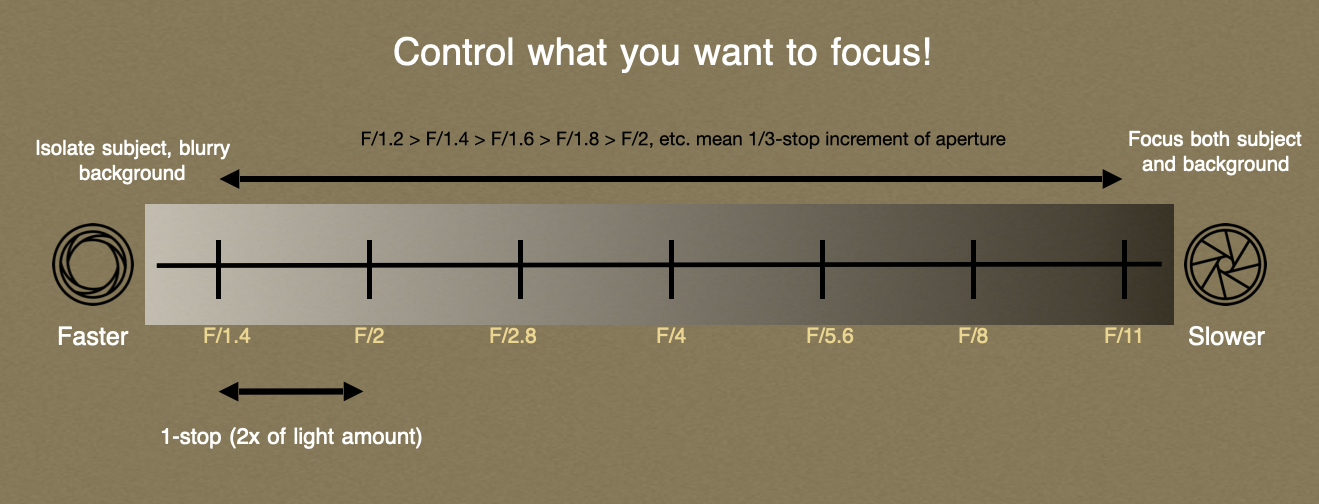
Aperture is one of the contributors in the depth of field (DoF, read the DoF post here), which controls the amount of background in-focused. A basic concept for aperture:
- F-stop is used to determine the amount of light pass through the lens;
- The smaller F-stop value (e.g., F/1.2, F/1.4), the more light pass through the lens;
- Terms like “fast”, “large”, “bright”, “wide-open” are used to describe aperture F/1.2, F/1.4, F/1.8, F/2;
- Each one full F-stop equivalent to double amount of light;
- Some other commonly seen F-stop like F/1.2, F/1.8, F/3.5 are 1/3 incremental values, e.g., F/1.2 is 1/3-stop brighter than F/1.4.
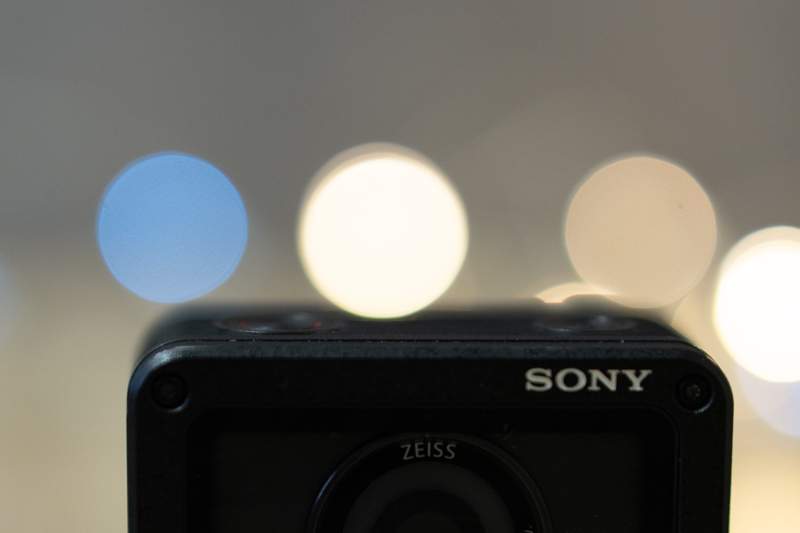
One F-stop of aperture may affect the background blurriness differently, depending on the scenarios:
- The bokeh ball sizes will have significant visual difference;
- General background blurriness difference is barely noticeable
F/1.8 prime lens is a good consideration as your first prime lens. It is smaller, lighter, and more budget-friendly than a F/1.4 counterpart, yet gives a significant subject isolation than a zoom lens.
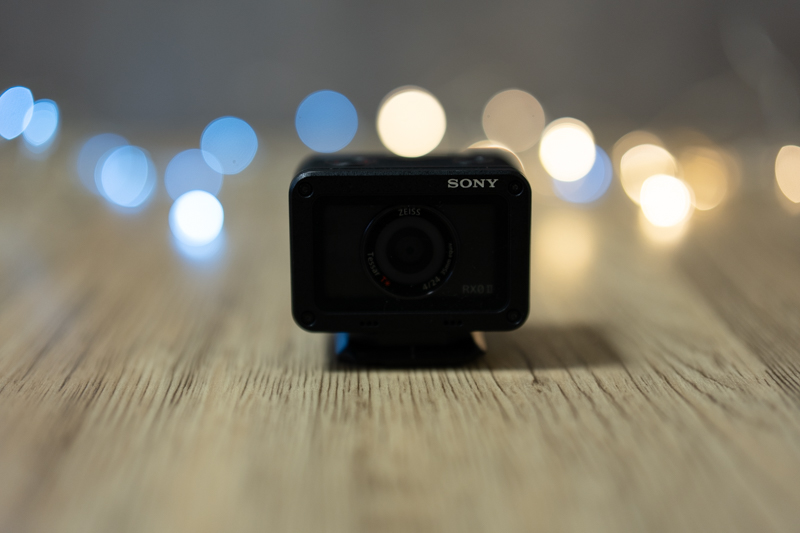
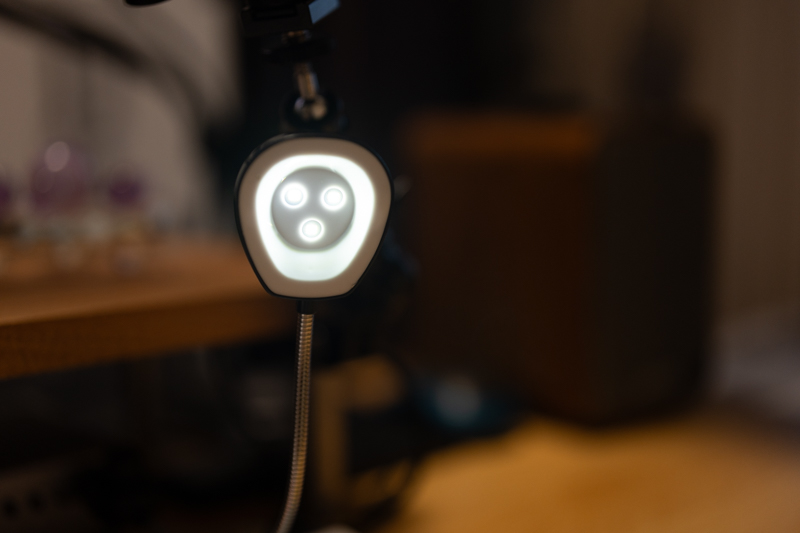
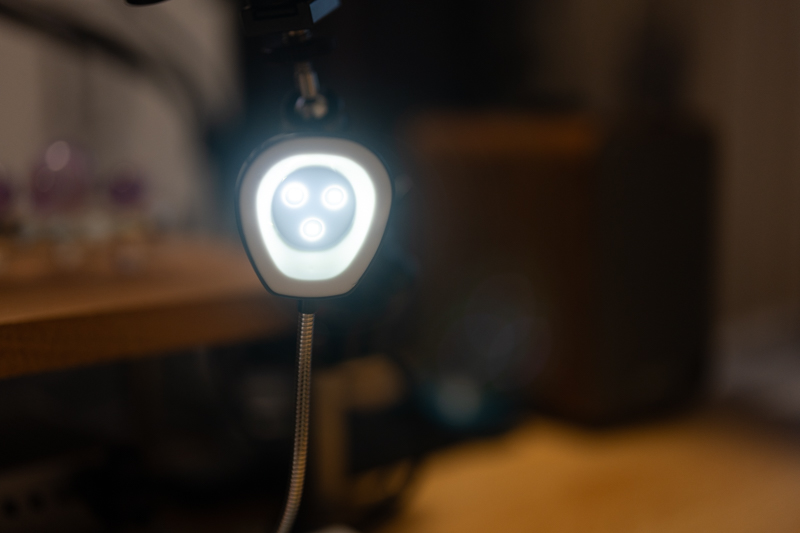
Bokeh Balls Comparison – F/1.4 vs F/2


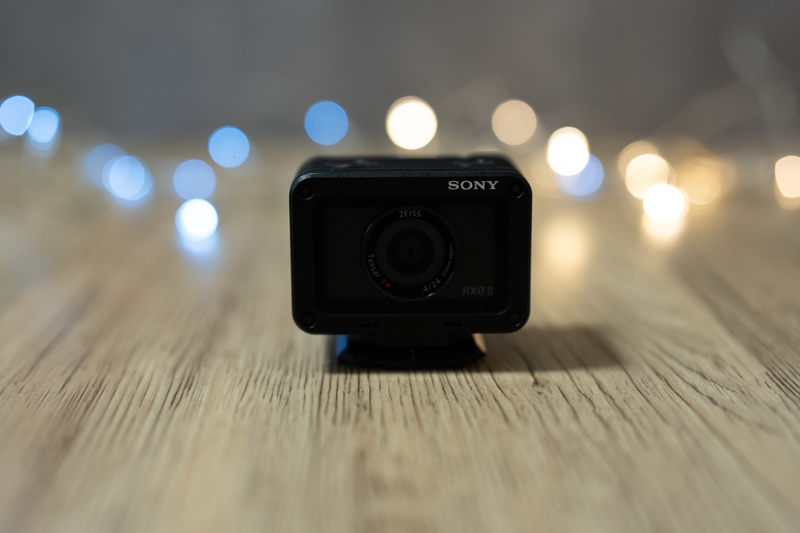
Background Blurred Comparison – F/1.4 vs F/2
Focal Length

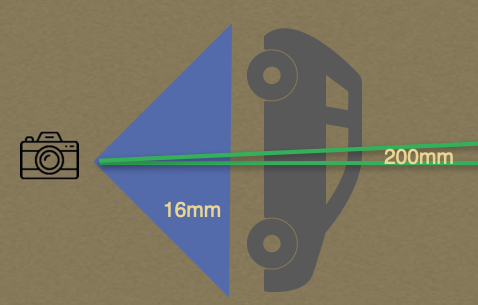
Focal length determines the area you can capture within the frame from the same distance:
- The smaller mm in focal length (wide-angle), the more area you can capture;
- The larger mm in focal length (telephoto), the narrower area you can capture;
- For example, if a car is parked at the blue solid triangle area,
- You may use 16mm or wider angle lens to capture the entire car;
- if you switch to a 200mm lens, you are likely only capture the car door’s handle from the same distance.
Besides, focal length will exaggerate or compress your subjects:
- Wide-angle focal length tends to exaggerate the nearer subject while shrinking the background items
- Telephoto focal length tends to compress everything, makes the background items look larger and closer to your subject in the front.
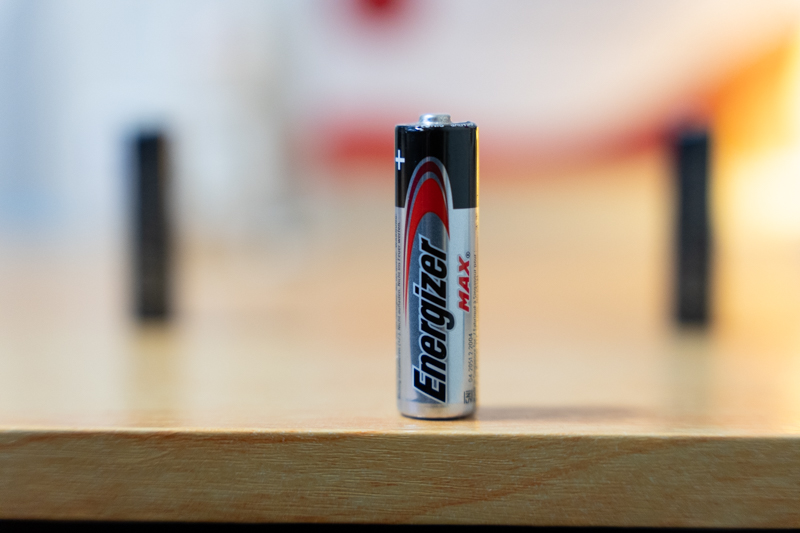
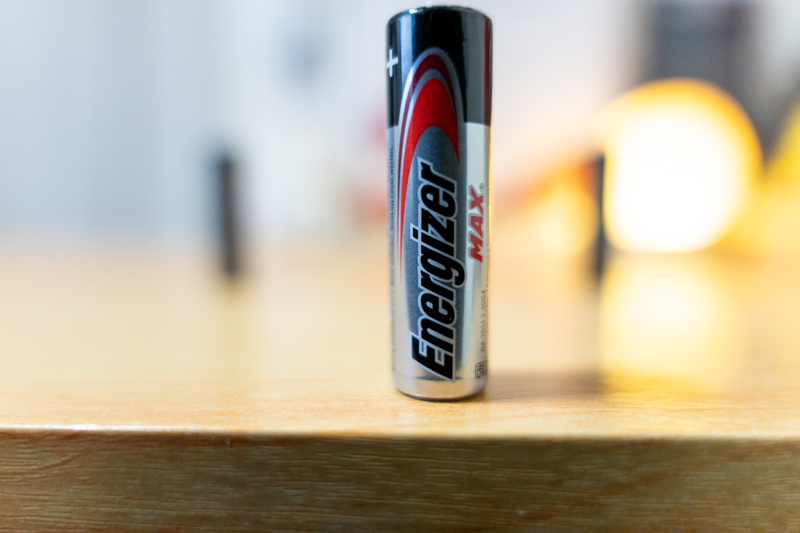
Look at the 24mm vs 200mm Compression comparison, the compression occurs when you try to use different focal lengths to frame the subject similarly. In the example, I framed the Energizer AA battery in roughly the same size and composition with 24mm and 200mm:
- In the 24mm photo, the two AA batteries in the background look much smaller and further away from the Energizer AA battery;
- In the 200mm photo, the two AA batteries in the background look similarly large as the Energizer AA battery ;
- The battery look further away from the desk edge in the photo taken with 24mm.
If you take photos at 24mm and 200mm at the same spot, and then crop the 24mm photo into the same framing as 200mm, there shall be no visual difference.
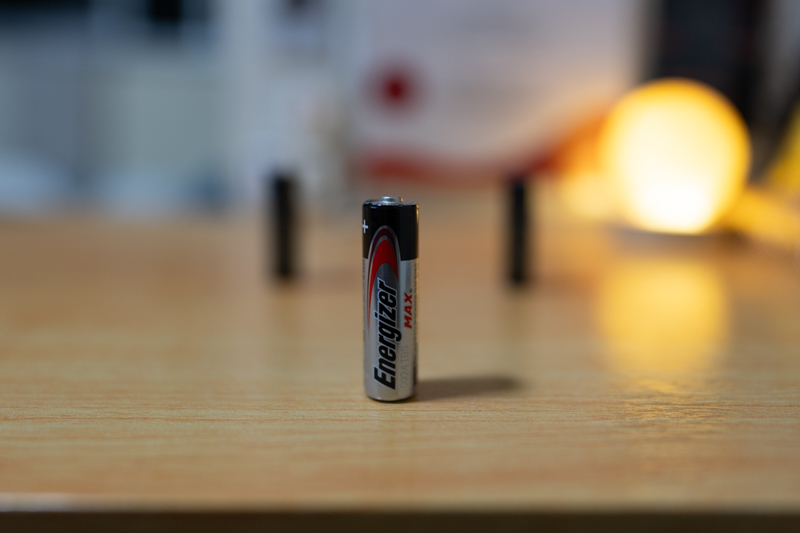
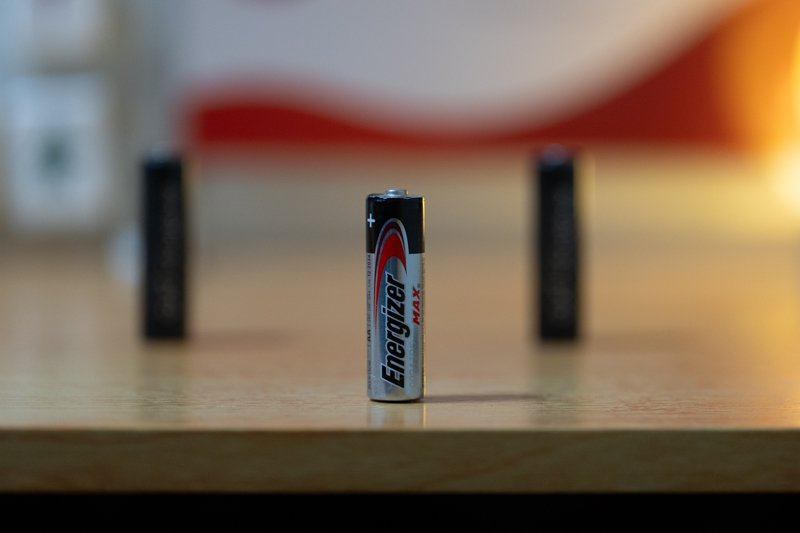
24mm vs 200mm Compression
Focusing
Lens plays a part in determining the autofocus (AF) responsiveness, accuracy, and reliability, together with the camera’s AF computation power. The lens AF motor mechanisms greatly affect the AF performance:
- Stepping motors – older AF mechanism, louder and less responsive;
- Linear motors – newer AF mechanism, faster, more accurate, and less noisy.
The minimum focusing distance has became a lens’ trending feature, which affects the subject’s size you can reproduce in the photos (the magnification ratio):
- A macro lens has a 1:1 (1x) or larger magnification ratio;
- Some manufacturers state the magnification ratio like 1:4, which is the same as 0.25x;
- Certain lenses can achieve higher magnification ratio by manual focus only;
- Typical zoom lenses have different magnification ratios on its wide and telephoto-end.
You may get a screw-on close-up filter to achieve a larger magnification ratio.
0.25x at 70mm vs 0.37x at 24mm
2. Understand The Lens Optical Performance
In short, modern lenses are good enough for daily life documentation. However, it is good to understand what others are talking about a lens optical performance.
Sharpness
You might be obsessed/lost with the manufacturer’s MFT chart, don’t worry:
- Soft corners at F/1.4, F/1.8 etc. are acceptable for portraits:
- your subjects are supposedly placed closer to the center of the frame;
- If you requires corner-to-corner sharpness (e.g., landscapes, group photos):
- please stop down to F/5.6 or F/8;
- The smallest aperture on a lens, e.g., F/16, F/22, may lost the sharpness due to diffraction;
- Decentralized is a QC issue:
- when you bought a lens, do some test shots on a flat surface in parallel to your camera (e.g., a printing on the wall);
- your photos should look similarly sharp at both sides;
- if one side of the photos consistently look blurry, send your lens to the service centre.
Distortion and Vignetting
- Distortion
- barrel – straight lines look bloated, commonly seen in wide-angle lenses;
- pincushion – straight lines look dented, commonly seen in telephoto lenses;
- mustache – complicated wave-like distortion, commonly seen on budget zoom lenses.
- Vignetting – darker corners in the photos;
- Modern lenses rely on profiles to post-correct these defects;
- Read the relevant lens reviews to determine if such corrected distortion is acceptable to you.
Before vs After Distortion and Vignetting Correction
Chromatic Aberration (Lateral and Longitudinal)
- Lateral CA – an unusual purple/magenta color cast on the high-contrast boundaries (e.g., backlit, jewellery, etc.);
- can be simply fixed in post-processing for most of the scenarios.
- Longitudinal CA – an unusual green/magenta color cast before/after the focused area (focus plane).
- can be fixed by stop down the aperture.
Before vs After Lateral CA Correction
Flare
- lost of contrast with strong light source or in backlit scenarios;
- affected by the lens elements’ coatings;
- can be reduced by using lens hood – only if such strong light source is coming from the side;
- could be caused by low quality UV filter/protector.
Flaring Due to Low Quality Lens Filter
Bokeh
- Cat-eye shape bokeh is common when the lens is used at its largest aperture (e.g., F1.2, F1.4, etc.):
- stop down the aperture can help to make the bokeh more circular;
- Onion-ring bokeh is more commonly seen on zoom lenses or entry-level prime lenses;
- Creamy round bokeh is usually found in the center frame of a photo taken with high-end prime lenses.


Bokeh F1.4 vs F1.8
3. Any Other Things I Should Understand About a Lens ?
Yes! There are some myths and debatable topics, and I will share the insights with my experiences as the following:
Prime or Zoom Lens As My First Lens?
If you are here to look for advise for your first lens, I will recommend:
- In general, get a super zoom lens with focal length between 20mm – 200mm as your first lens:
- Sigma 20mm – 200mm F/3.5 – F/6.3 (available for L-mount and Sony E-mount);
- Tamron 25mm – 200mm F/2.8 – F/5.6 (available for Sony E-mount);
- If you only have time to take photos in the evening or night:
- consider a constant aperture zoom lens like a 24mm – 70mm F/2.8 or 28mm – 75mm F/2.8 (most brands have such constant aperture zoom lens in this focal length range);
- Discover your favorite photography genre with a zoom lens, e.g., sports, animals, landscapes, cityscapes, architectures, foods, street, environmental portraits;
- Don’t worry about the variable apertures in those super zoom lenses (e.g., in a zoom lens, you can use F/3.5 on 20mm but the 200mm only has F/6.3 available):
- you will get a prime lens of your most favourite focal length soon 😉
- Soft creamy background produced by a F/1.4 or F/1.8 prime lens can be attractive, but you missed the perspectives from different focal lengths unless you buy all those classic focal length prime lenses, e.g., 24mm, 35mm, 50mm, 85mm, 135mm, 200mm, etc.;
- Wide-angle lenses like 24mm or 35mm require a fast F/1.4 to pop the creamy background, where a F/2.8 or even F/4 at 200mm could give the beautiful creamy background as well;
Use your zoom lens to take a few thousands photos:
- find out the most used focal length range (e.g., 32mm to 38mm) ;
- such range should be your first prime lens’ focal length (the closest prime lens will be a 35mm).
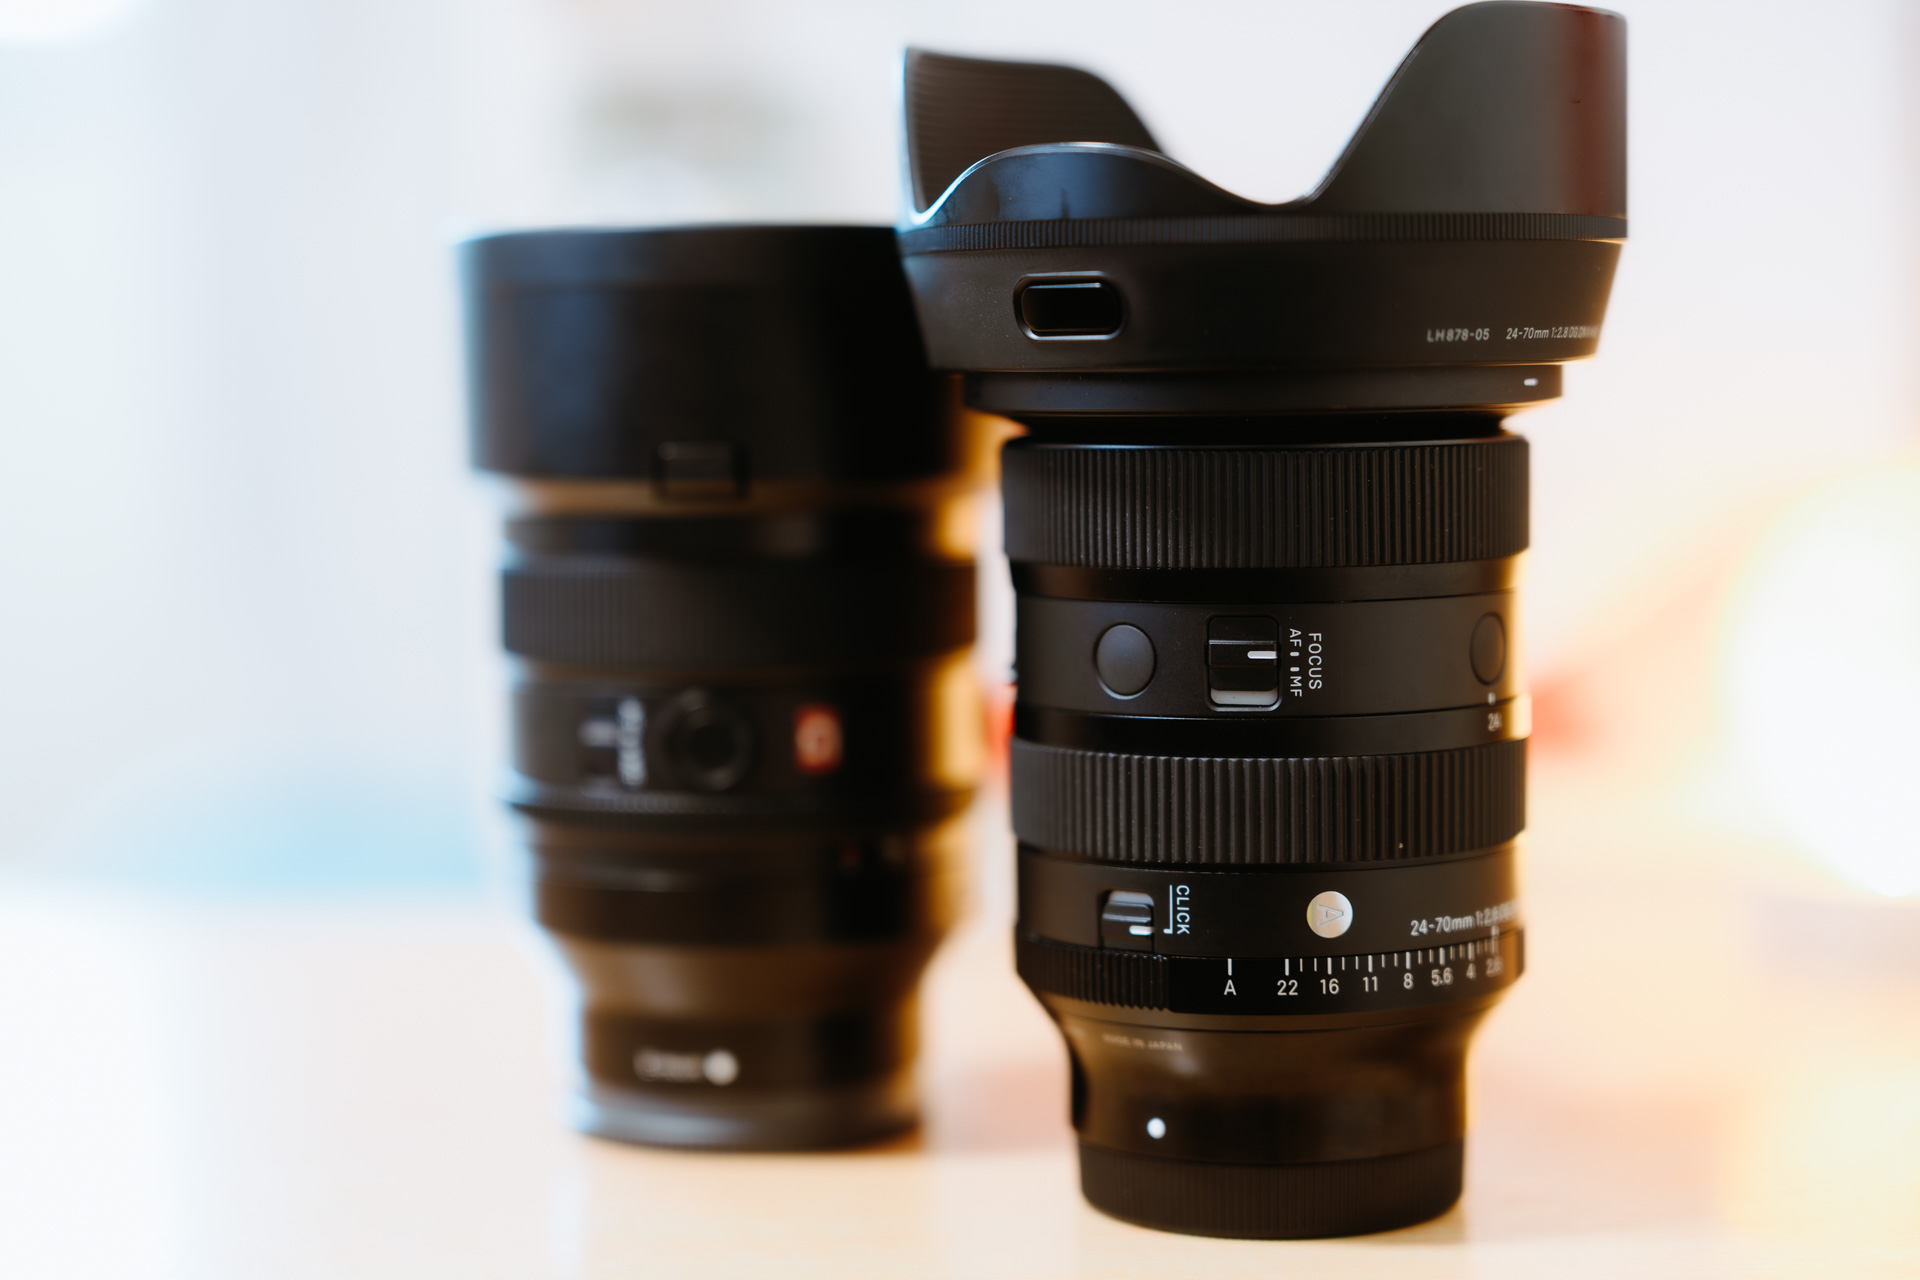
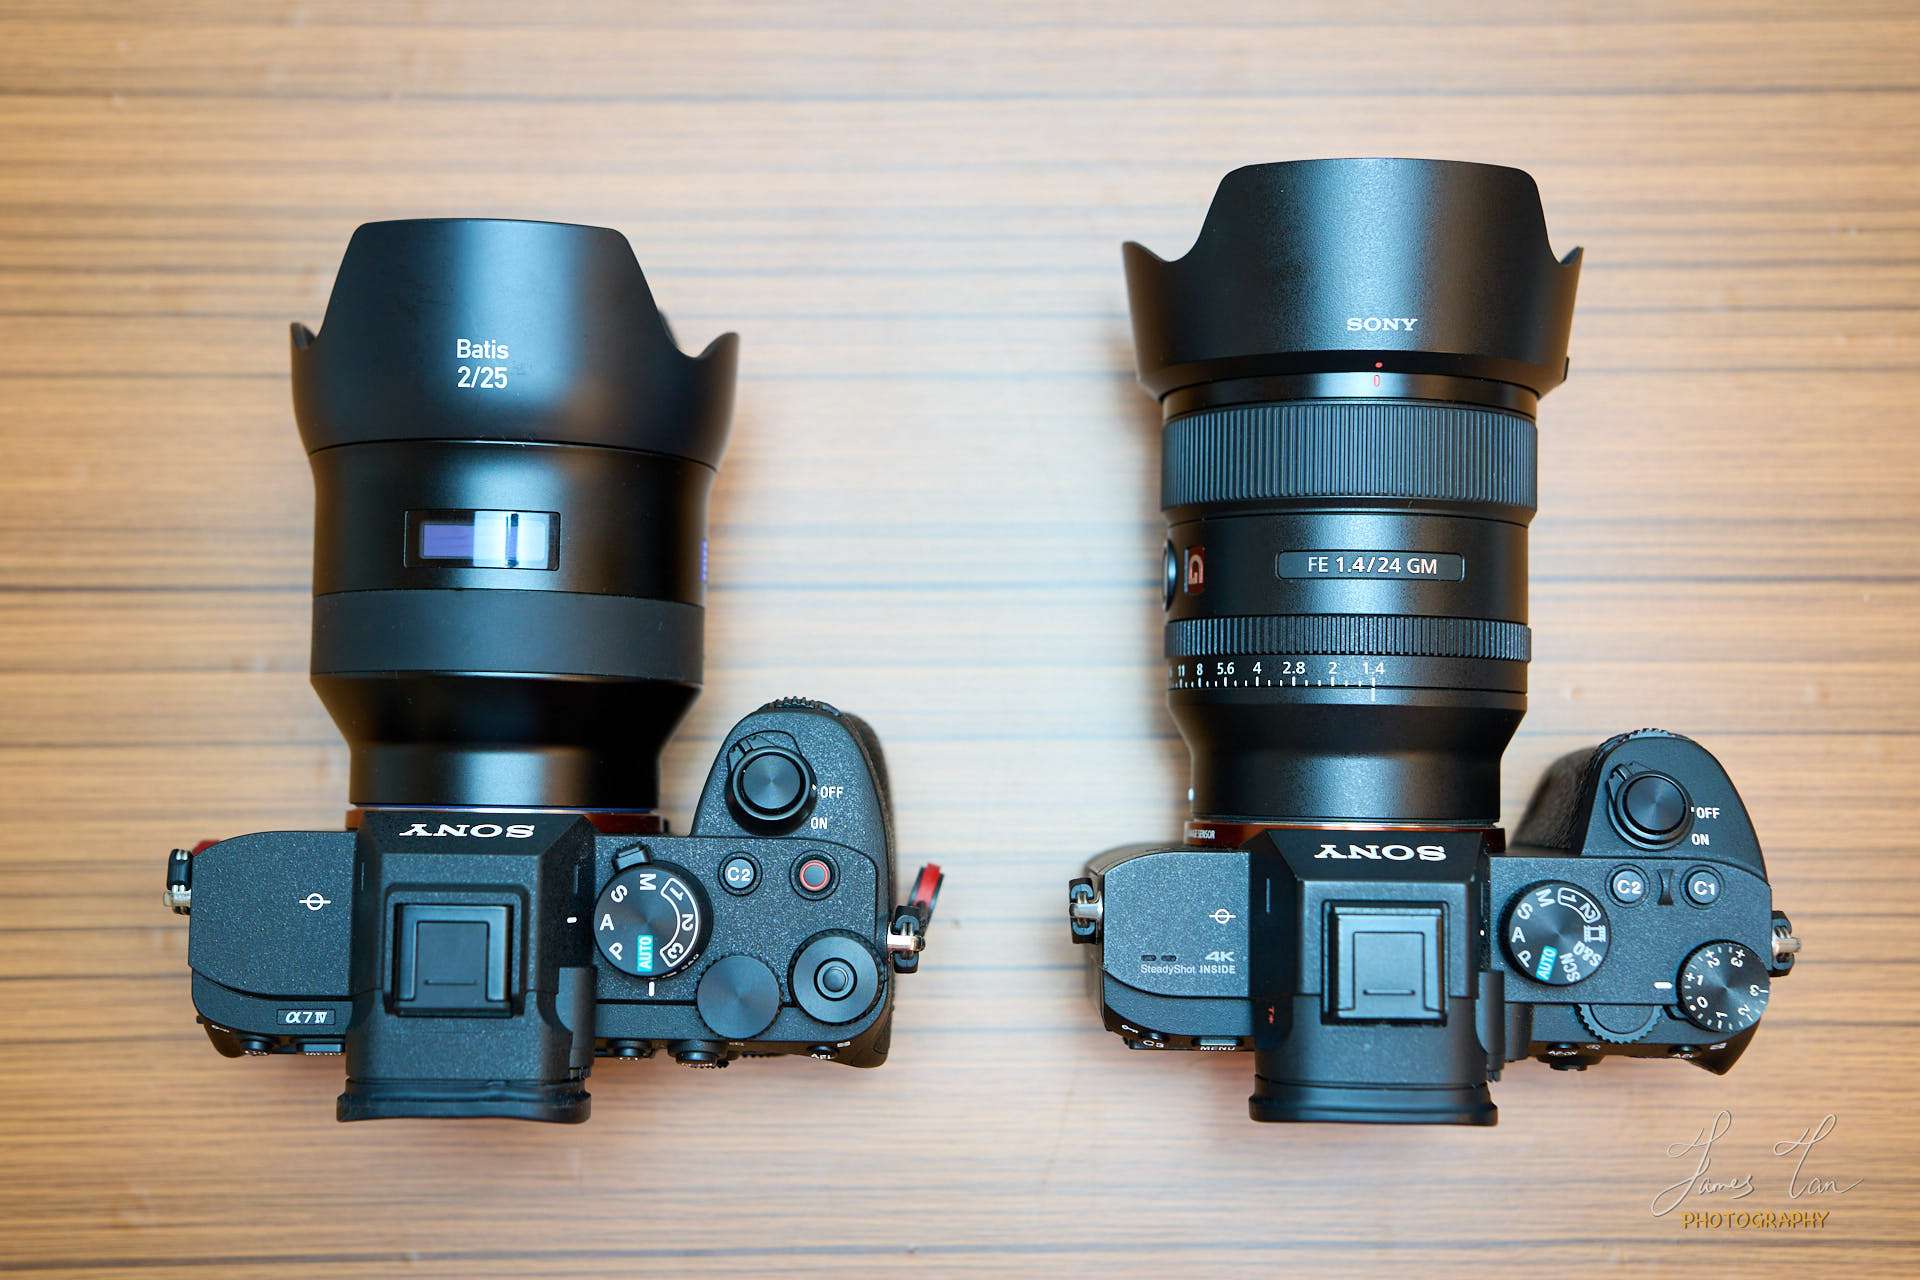
OEM vs Third Party Lenses
Both OEM and third party lenses have their own tiers, and we shall always compare the same/similar tier lenses:
- OEM lenses tend to have better AF performance in terms of responsiveness, reliability and consistency, e.g., focusing in low light environments, fast moving subjects towards/away from you:
- the AF hit rate could be like 95% (OEM) vs 85% (third party) – of course, some older designed lenses might have lower hit rate like 60% – 80%;
- such hit rate is only crucial for those non-repeatable moments, e.g., the groom and bride march in, the VIPs entrance, sports, etc.
- Center sharpness is almost indistinguishable:
- corner sharpness is less a concern for portrait and general documentation photos;
- Pay more attention to the difference in flare-resistance and CA, they are determined by:
- the effectiveness of lens element coatings;
- the number of special lens elements, e.g., low-dispersion glass, aspherical glass, etc.;
- lens price is a general guideline, not a guarantee.
- Third party lenses are much cheaper than the OEM counterparts:
- most viewers cannot tell which lens is used to take the photos;
- you might only able to tell the difference in AF performance in those extremely dark environment or fast-moving subjects;
- save your money for camera accessories, e.g., extra batteries and memory cards, editing software, camera bag, camera strap, lens cleaning kit, etc.
Interchangeable APS-C and FF Lenses
You must know that your camera is a APS-C or Full-Frame (FF) camera, they are usually not interchangeable. However, some brands like Sony, the APS-C (E-mount) and FF (FE-mount) lenses are interchangeable:
- Using a FF lens on a APS-C camera is fine:
- a FF lens is larger and more expensive;
- it introduces crop factor (a 35mm FF lens will become a 52.5mm lens on a APS-C camera);
- you save the money when you upgrade your camera into a FF camera.
- Using a APS-C lens on a FF camera is not recommended:
- APS-C lens only covers partial area of a FF sensor, thus a 24 MegaPixels (MP) FF sensor will only output a 10MP photos;
- it introduces crop factor (a 35mm APS-C lens will become a 52.5mm lens on a FF camera);
Filters
There are different types of filters with different usages:
| Filter Types | Functions |
|---|---|
| UV or protector filter | – debatable in whether such filter is useful. |
| Circular Polarized (CPL) filter | – adjustable polarized effect; – reduce/remove reflection, glare; – enhance colors and contrast. |
| Neutral Density (ND) filter | – reduce the light amount intake at a fixed percentage, e.g., ND 8 for 3-stop, ND 16 for 4-stop, etc.; – stackable to block more light; – useful for video filming or taking photos with F/1.2 or F/1.4 lenses in sunny days. |
| Variable ND filter | – adjustable ND filter, e.g., ND 2 – ND 400; – use it with caution as the upper limit of VND filter may incur a dark “X” in your photos. |
| Closed-up filter | – amplify the subject size; – stackable for higher magnification ratio; – use it with caution as it reduces the image quality. |
Lenses come with different filter thread sizes like 49mm, 58mm, 62mm, 67mm, 72mm, 77mm, 82mm, etc.
- take a look at your lens collection, then get the filter for your largest thread size lens
- 82mm could be a good baseline for FF lenses – most F/1.4 prime lenses and F/2.8 zoom lenses have 82mm or smaller filter thread sizes;
- use a step-down ring to fit the larger filter onto those smaller lenses;
- the larger the filter, the more expensive.
Use a Quality UV / Protector Filter
Using a UV or protector filter on a lens is a highly debating topic. I use protector filters on my lenses:
- A filter does not save your lens from falling, a lens hood does a better protection job;
- A filter prevents your lens from micro-damaging by hard particles, e.g., sands;
- A filter reduce the need to clean the lens front element – prolong your lens coating lifespan;
- Look for a multi-coated filter, the more layers the better;
- Pay attention to the light transmission rate (the higher the better) and reflection rate (the lower the better);
- Spend around 3% – 5% of your lens price as a budget for a good filter:
- if you only get the budget at around ~$20, don’t buy it – such filter might significantly lower your photo quality;
- look for some reputable brands, e.g., B+W, Hoya, Nisi, Nikon Arcrest, etc. Their similarly priced filters have very close quality.
- Each manufacturer may have different grades of filters – they meant it.
Final Thoughts
Everyone use the photography gears differently. Understand the lens basics will help you to advance in the photography journey with lesser obstacles, and don’t be limited by what you have! A lens is a tool to visualize your ideas, use a zoom lens to explore the perspectives in different focal lengths first then refine your vision with prime lenses.
Happy shooting!

Leave a Reply